ClusterIP
The simplest way to expose a service is to use a ClusterIP. This is the default service type and it exposes the service on a cluster-internal IP. Only pods within the cluster can access the service.
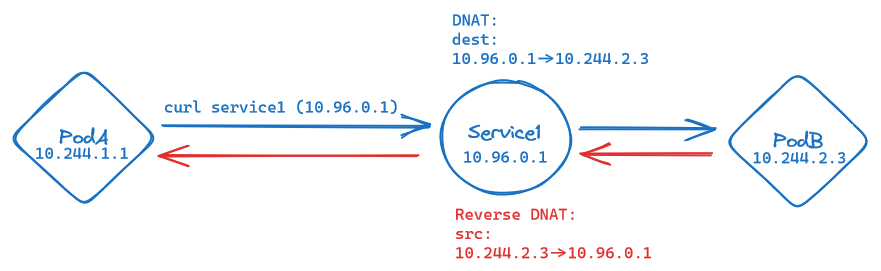
As we can see in the figure above, the ClusterIP service is exposed via a virtual IP in a dedicated service subnet.
Upon request by a client, the service IP gets DNAT-ed to the pod IP of one of the pods in the service. The pod is selected by the service selector. On the way back, the pod IP gets reverse DNAT-ed, back to the service IP.
DNS Resolution
Another advantage of using Services instead of Pods is that Services get a DNS entry in the cluster-internal DNS server. This allows us to use the service name as a hostname in our applications.

.svc. indicates the service domain to the DNS serverWith this DNS service in place, we can use the service name as a hostname in our applications. The DNS server will resolve the service name to the service IP. This is great, because it allows us to deploy microservices independent from one another - all that needs to be established is the service name.
Creating services
Let's try and see for ourselves if all my claims hold true: we'll create a ClusterIP service for our podinfo deployment and see if we can access it from within the cluster.
Once again, we can use an imperative cmdlet to create our service manifest:
mkdir networking
kubectl expose deployment podinfo --port 80 --target-port 9898 --dry-run=client -o yaml > networking/podinfo-clusterip.yaml
The manifest looks like this:
apiVersion: v1
kind: Service
metadata:
  creationTimestamp: null
  labels:
    app: podinfo
  name: podinfo
spec:
  ports:
  - port: 80 # (1)!
    protocol: TCP
    targetPort: 9898 # (2)!
  selector: # (3)!
    app: podinfo
status:
  loadBalancer: {}
- By default,
portandtargetPortare the same. As we want to route HTTP traffic, settingportto 80 for our service allows us to omit the port when calling it. - The
targetPortneeds to stay9898in order for traffic to be forwarded correctly. - The service selector is the same as the deployment selector. This means that the service will select the same pods as the deployment.
Let's apply the manifest and take a look at the service and its detected endpoints:
kubectl apply -f networking/podinfo-clusterip.yaml
kubectl get service,endpoints -l app=podinfo
✅ Looking good! We can see our service with its virtual IP, the port it's listening on and the endpoints it has detected and will forward traffic to.
NAME              TYPE        CLUSTER-IP     EXTERNAL-IP   PORT(S)   AGE
service/podinfo   ClusterIP   10.96.132.79   <none>        80/TCP    0s

NAME                ENDPOINTS                                            AGE
endpoints/podinfo   10.244.1.16:9898,10.244.2.15:9898,10.244.2.16:9898   0s
Lab 7: Connecting to your service
Let's try connecting to our service from within the cluster:
- Start an interactive shell session in your
nginxpod usingkubectl exec. - Try
cURLing the displayedClusterIP
Stretch Goal: DNS resolution
- Try
cURLing the service name instead of theClusterIPfrom within thenginxpod. - Try calling the 'complete' DNS name of the service, following the pattern above.
Created: September 16, 2023